Driver issues:
Windows 7: Windows could not find drivers. I downloaded them from www.ftdichip.com/FTDrivers.htmbut they never worked.
I got my son's laptop which has windows 10. Windows 10 found the drivers on it's own and the printer worked
Later I tried with Windows 8 and it also found the drivers on it's own and the printer worked perfectly.
3D Printer Software and Setup
Got Repetier-Host from http://www.repetier.com/I did not install the Server, just the printer software.
Printer Settings:
I used the Mini Fabrikator manual to setup the printer settings in Repetier-Host.Note: if you are going to use the Hobby King files check all the settings because there I did find one error. HK settings left the print-bed temperature setting at 50 and it needs to be zero since the bed is not heated.
Testing the Printer:
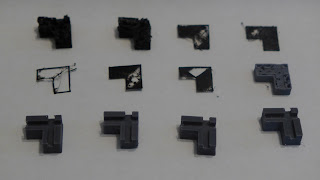
Downloaded the feet for a test print. http://www.hobbyking.com/hobbyking/store/uploads/190272564X1889017X50.zipHere are the results in the order in which they were printed:
As you can see the first prints were not very good. I just let the printer to continue printing the first and second time even though the print looked bad.
After two prints, I realized there was not enough material was coming out of the extruder. I found a blog that said, "Fail early and often." In other words, stop the print as soon as you know it's not going well.
I tried to adjust the heat and flow rate and tested on the first layer. Flow rate appeared to be the key to fixing the prints.
I got a nice start by assisting the feeder but ran out of the black which came with the printer and switch to gray. I re-entered all the printer's defaults and on my first gray print I assisted by pushing the filament. It was so close to a good print but at the end I got side track and stopped assisting the filament.
The first good print I produced by putting marks with a sharpie on the filament to see if it was feeding. Surprise, it was not consistently fed into the extruder. I watched the feeder for the whole print and pushed it when needed. I got a good print. While it was printing I noticed the allen screw in the picture below was not tight and could be used to put more tension on the filament.
I carefully tightened it up just enough to get a consistent feed. Now it prints like a champ.
Hindsight being 20/20: Setup the printer then use the extrude button to feed 10mm of filament. If it slips, tighten the feeder OR raise the heat from 190. I ended up at 210C.
Hindsight being 20/20: Setup the printer then use the extrude button to feed 10mm of filament. If it slips, tighten the feeder OR raise the heat from 190. I ended up at 210C.
I put the feet on the printer. Very nice!
Here is a chip clip from thingverse.com. It came out fantastic! (but it only sort of works)


Hello, nice review :-)
ReplyDeleteI've received mine and even though I have experience with 3D printers, had similar issues... I totally overlooked the bowden extruder stepper's spring tension, as my other printer is so well adjusted I never had to change it and totally forgot about it :-)
It's a cute little machine, I hope it will last. The quality so far surprised me, it took me a while to get my other one to print well. Though there's some Z wobble and they really should have made it easier to increase the belt's tension, and loosening the nozzle isn't easy either with the case, but hey, it looks nice...
Glad you enjoyed the review. I am still having issues with the 1st layer. It never puts down a good first layer. Any ideas about fixing that? Been googling around the net and haven't found a fix yet.
DeleteWorks for me, I've increased the extrusion amount for the first layer 10% percent or so and adjusted the endstop screw so it prints a bit closer.
ReplyDeleteThe PLA I bought elsewhere and the blue tape work very well. I had mixed experience with other materials.
How do you increase the extrusion amount? flow rate? I think mine is set to .2 thickness for the first layer but that does not seem to work.
DeleteI'm new to CuraEngine, out of the head I just know it with Slicer :-) Flow rate, yes. Toy with the Extrusion width and of course brim and raft, but with the standard settings the Z home calibration really makes a difference. I tend to set it a bit tighter. Too tight and the layer will be squished or the print-head scrapes over the bed, so be careful :-)
ReplyDeleteI have one of these printers also some others and I cant have this printer on my desk while printing all the time so I went to get a longer USB cable and It didn't work. let me know if you had this problem and if you fixed it or not.
ReplyDeleteI have also a Mini and refering to bad first prints on the bed not sticking, moving along with the extruder. I have lowered the extruder tot the accepted level, but still it failed to stick the first layer good on the whole print... When checking the bed with Z=0 and moving X and Y I found out that at X=0 and Y=0 that the extruder was sitting higher then at Home position. How to level the bed because I do not see any regulators to adjust so all space between bed and extruder would be equal at any coordinate.
ReplyDeleteI guess it would depend what is making it unlevel. The bed or the rails. If there are not any adjusters I would use some shims or washers.
DeleteThis comment has been removed by a blog administrator.
ReplyDelete